
Ambient Light (Arduino Project)
This blog post explains the technical details of my Ambient Light project. If you don’t know what this project is about, watch the following video first:
Video summary: Sometimes a screen is just a light spot in a dark room. To make the entire scenery more appealing, I created my own, Arduino-powered ambient light. A PC software (written in C#) reads color information of the screen, performs some processing and forwards the color information to an Arduino, which is connected via USB. The microcontroller then regulates one or more RGB LEDs.
System Architecture
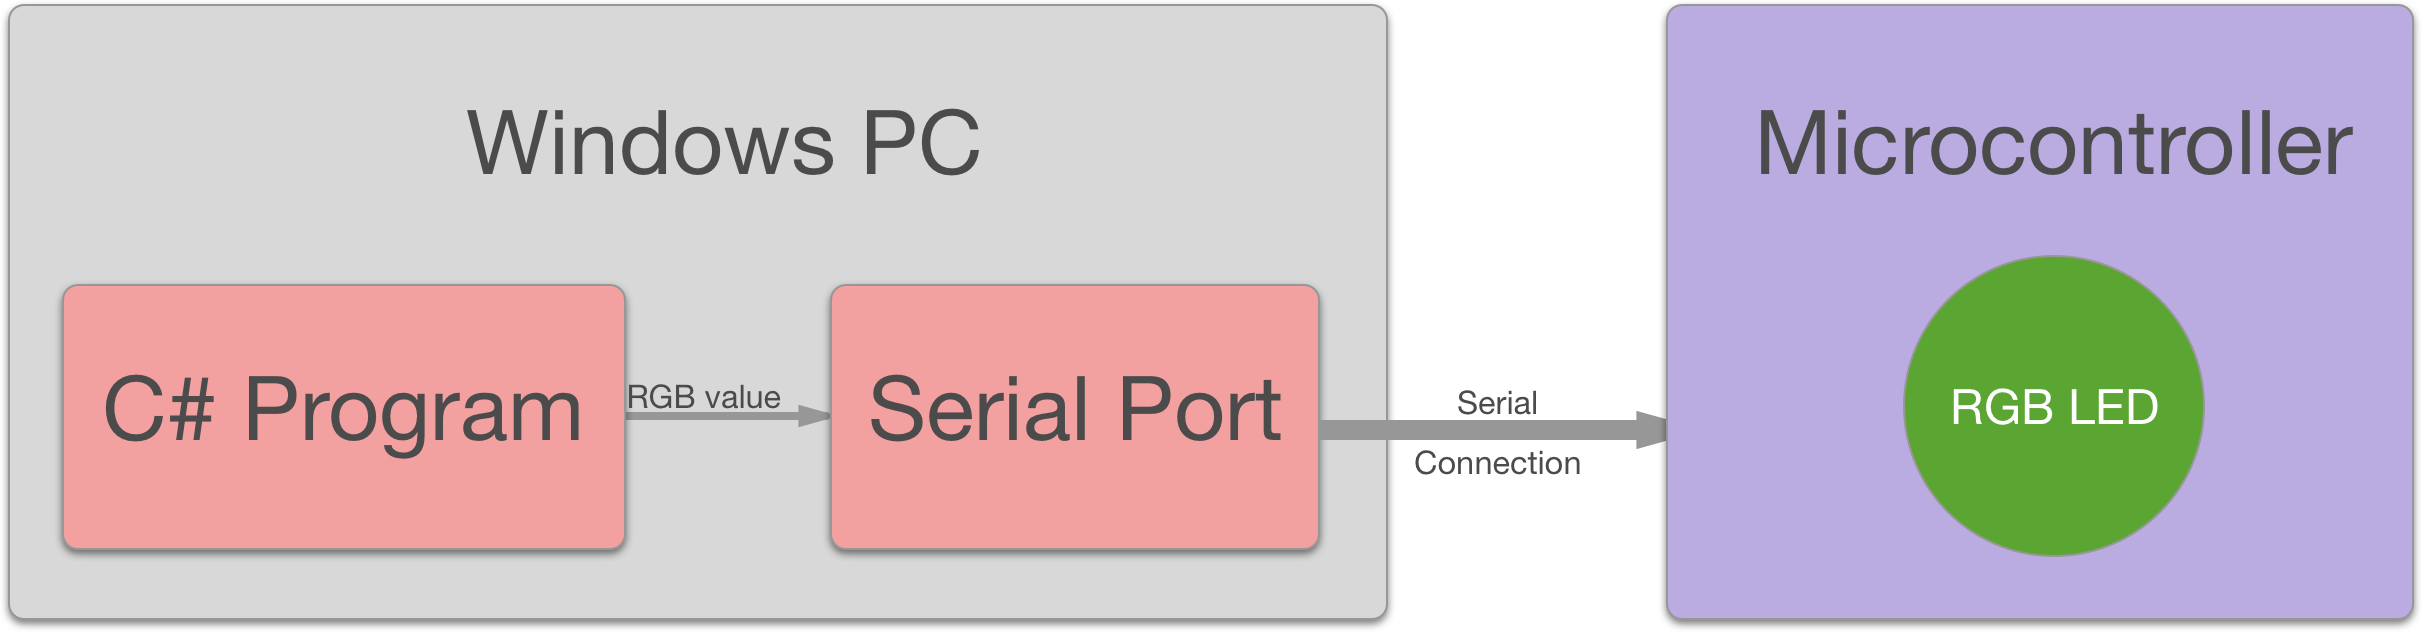
- The C# Program starts two threads: UI thread and “Screen color reading” thread
- The “Screen color reading” thread samples the average screen color.
- The average screen color’s saturation is being increased by a user-defined factor.
- The RGB value is being transmitted through the PC’s Serial Port.
- The Serial Port forwards the data to the a Microcontroller (e.g. an Arduino) via USB.
- The Microcontroller makes one or more RGB LEDs shine in the received color.
Software
Reading the Average Screen Color
Responsible for reading the screen color is the static class ScreenColor. Its method private static Bitmap GetScreenshot() returns a Bitmap object that represents the screen’s pixels.
private static Bitmap GetScreenshot()
{
  Bitmap bmpScreenshot = new Bitmap((int)GetPrimaryScreenWidth(), (int)GetPrimaryScreenHeight(), PixelFormat.Format32bppArgb);

  // graphics object from the bitmap
  using (Graphics gfxScreenshot = Graphics.FromImage(bmpScreenshot))
  {
    // take a screenshot of the entire screen
    gfxScreenshot.CopyFromScreen(0, 0, 0, 0,
      new Size(
        (int)GetPrimaryScreenWidth(),
        (int)GetPrimaryScreenHeight()),
      CopyPixelOperation.SourceCopy);

  }

  return bmpScreenshot;
}
Now calculating the average color of a bitmap is more resource consuming than expected. The Ambient Light class provides two methods of achieving that task:
public static BasicColor GetAverageScreenColor(DeterminationMethod method)
{
  Bitmap screenshot = GetScreenshot();
  BasicColor avgColor = new BasicColor();
  switch (method)
  {
    case DeterminationMethod.Interpolation:
      Bitmap bmp = new Bitmap(1, 1);
      using (Graphics g = Graphics.FromImage(bmp))
      {
        // updated: the Interpolation mode needs to be set to
        // HighQualityBilinear or HighQualityBicubic or this method
        // doesn't work at all.  With either setting, the results are
        // slightly different from the averaging method.
        g.InterpolationMode = InterpolationMode.HighQualityBicubic;
        g.DrawImage(screenshot, new Rectangle(0, 0, 1, 1));
      }
      Color avg = bmp.GetPixel(0, 0);
      bmp.Dispose();
      avgColor = new BasicColor(avg.R, avg.G, avg.B);
      break;
    case DeterminationMethod.Partly:
      long sumR = 0, sumG = 0, sumB = 0, pxlCount = 0;
      int stepSize = 20;

      for (int x = 0; x < screenshot.Width; x += stepSize)
      {
        for (int y = 0; y < screenshot.Height; y += stepSize)
        {
          Color pixel = screenshot.GetPixel(x, y);
          sumR += pixel.R;
          sumG += pixel.G;
          sumB += pixel.B;

          pxlCount++;
        }
      }
      avgColor = new BasicColor(
        (byte)(sumR / pxlCount),
        (byte)(sumG / pxlCount),
        (byte)(sumB / pxlCount));
      break;
  }

  screenshot.Dispose();
  return avgColor;
}
The first method DeterminationMethod.Interpolation uses a technique that Musi Genesis shared on StackOverflow. It interpolates the bitmap to another bitmap of size 1×1 which results in an approximate average.
The second method DeterminationMethod.Partly calculates a true average by iterating over the entire image. In order to increase the performance it takes only every 20th pixel into account (defined in the variable int stepSize ).
C# Application V2
Because a customer who ordered the system had specific requirements I’ve added a few more features to the PC software:
- Minimizinig the window hides the task bar icon and shows it only as a little icon in the tray bar (bottom right corner).
- Adjustment of the brightness is now possible (slider).
- Bugfixes
Sending Data to an Arduino
For the C# program the SerialPort class does the job of transmitting data. The reception is also rather simple. After opening the serial connection on the Arduino the following code handles the incoming bytes:
if (Serial.available() == 3) {
  r = Serial.read();
  g = Serial.read();
  b = Serial.read();

  setOutputColor(r, g, b);
}
if (Serial.available() > 3) {
  Serial.flush();
}
The second if-condition makes sure that the program works, even when the connection is interrupted during a transmission.
Source Code
The source code is available on GitHub: Simsso/Ambient-Light
Hardware
Technically every microcontroller that is capable of receiving data over a serial connection could do the hardware-job. An Arduino is particularly easy to deploy, due to the availability of a Serial class. The same is valid for the Teensy microcontroller and other Arduino compatible devices. However, it’s also possible to use a smaller microcontroller, e.g. an ATtiny85. As Ido Gendel explains in his blog post Getting an ATtiny85 to transmit over serial it doesn’t require too many lines of code to get an ATtiny to learn the serial protocol that is used for the communication.